Introduction to Landscape Oil Painting
Welcome to the fascinating world of landscape oil painting. This art form is a beautiful way to capture the grandeur of nature and express it on canvas. Whether you’re a beginner or an experienced artist, understanding the basics and exploring the art of capturing nature’s beauty is essential. Let’s dive in!
- Understanding the basics of landscape oil painting
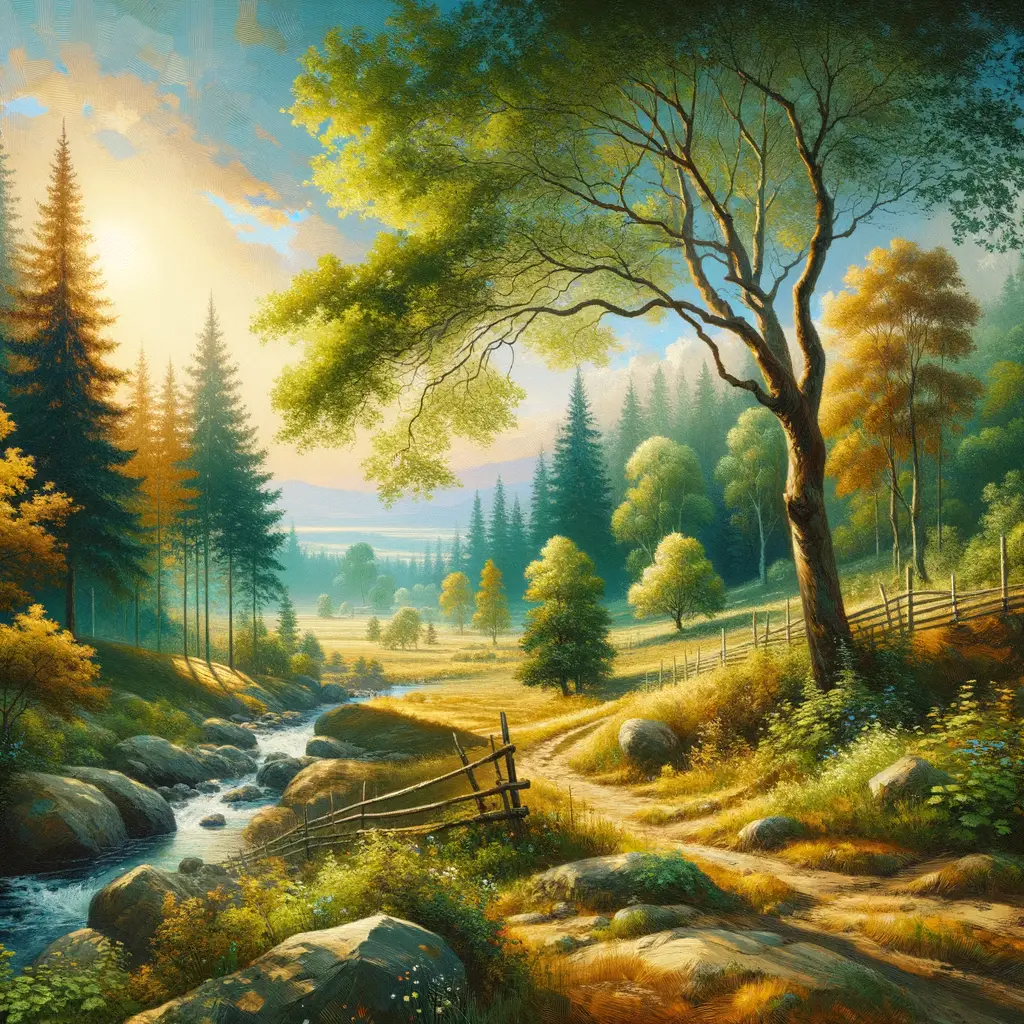
Landscape oil painting is a type of art that focuses on depicting natural scenery such as mountains, forests, rivers, and fields. The primary medium used is oil paint, which is known for its rich and vibrant colors. The basic elements of landscape oil painting include composition, color, and texture. Understanding these elements is the first step towards mastering this art form.
Composition refers to the arrangement of elements in a painting. It’s about creating a balance between the different parts of the scene. Color, on the other hand, is about using the right hues to evoke certain emotions. Texture is about creating a sense of depth and dimension in the painting.
- Exploring the art of capturing nature’s beauty in art
Capturing the beauty of nature in art is a skill that takes time and practice to develop. It’s about observing the world around you and translating it into your own unique artistic language. It’s about finding the extraordinary in the ordinary and bringing it to life on canvas.
One way to explore this is by going out into nature and sketching or painting what you see. This practice, known as plein air painting, can help you develop a deeper connection with the natural world and improve your ability to capture its beauty in your artwork.
Another way is by studying the works of famous landscape artists. Artists like Claude Monet and Vincent van Gogh were masters at capturing the beauty of nature in their paintings. By studying their works, you can gain insights into their techniques and find inspiration for your own art.
Landscape Oil Painting Techniques
Mastering the art of landscape oil painting requires a solid understanding of the basics. This includes choosing the right brushes and paints, understanding color theory, and learning how to blend colors effectively. Let’s dive into these essential techniques.
Understanding the Basics
-
Choosing the Right Brushes and Paints
Choosing the right brushes and paints is the first step towards creating a beautiful landscape oil painting. Brushes come in various shapes and sizes, each serving a unique purpose. Flat brushes, for instance, are perfect for creating sharp edges and lines, while round brushes are great for detailed work. When it comes to paints, oil paints are preferred for their rich, vibrant colors and slow drying time, which allows for easy blending. Wikipedia has a comprehensive guide on oil paints that you may find useful.
-
Understanding Color Theory in Landscape Painting
Color theory is a fundamental concept in any form of painting, including landscape oil painting. It involves understanding how different colors interact with each other and how they can be used to evoke certain emotions. For example, warm colors like red and yellow can create a sense of warmth and excitement, while cool colors like blue and green can evoke feelings of calm and tranquility. Understanding color theory can greatly enhance the overall impact of your painting.
-
Mastering the Art of Blending
Blending is a crucial technique in landscape oil painting. It allows you to create smooth transitions between different colors and tones, adding depth and realism to your painting. The key to effective blending is to work while the paint is still wet and to use a clean brush for each color. Remember, practice makes perfect, so don’t be discouraged if you don’t get it right the first time.
Understanding these basics is the foundation of landscape oil painting. Once you’ve mastered these techniques, you’ll be well on your way to creating stunning landscape oil paintings.
Advanced Techniques
As you continue to grow in your landscape oil painting journey, you will find that there are more advanced techniques that can help you create more realistic and captivating paintings. Let’s dive into some of these techniques.
- Creating Depth and Perspective
- Mastering Light and Shadow
- Painting Different Weather Conditions
Creating depth and perspective in your landscape oil painting can make your artwork come alive. Depth gives your painting a three-dimensional feel, while perspective helps the viewer understand the relative distances between objects in the painting. To create depth, use color and size variations. Objects that are further away should be smaller and less vibrant. For perspective, remember that lines converge at a point in the distance, known as the vanishing point. Practice these techniques to enhance the realism of your paintings. Learn more about perspective here.
Light and shadow play a crucial role in setting the mood of your landscape painting. Understanding how light falls on different objects and how shadows are cast can add a dramatic effect to your artwork. For instance, a setting sun can cast long shadows and create a warm, golden glow. On the other hand, a bright midday sun can create harsh shadows and bright highlights. Experiment with different light sources and observe their effects on your painting. Here is a resource to understand more about light and shadow in art.
Weather conditions can greatly influence the atmosphere of your landscape painting. A sunny day can evoke feelings of joy and warmth, while a rainy day can create a sense of melancholy or calm. To paint different weather conditions, observe nature closely. Notice how colors change with different weather conditions. For example, during a rainy day, colors can appear more muted, while on a sunny day, they can be more vibrant. Practice painting different weather conditions to add variety to your landscape paintings. Here’s more on how weather influences landscape painting.
Remember, these advanced techniques require practice. Don’t be discouraged if your first few attempts don’t turn out as expected. Keep practicing, and you’ll see improvement over time. Happy painting!
Oil Painting Nature Scenes
One of the most captivating subjects for oil painting is nature. The beauty of the natural world, with its diverse landscapes and unique elements, offers endless inspiration for artists. In this section, we will focus on painting forests and trees, exploring how to understand tree anatomy for painting and how to create texture and depth in foliage.
Painting Forests and Trees
Forests and trees can be both challenging and rewarding to paint. They require a good understanding of tree anatomy and the ability to create texture and depth in foliage. Let’s delve into these topics.
- Understanding Tree Anatomy for Painting
- Creating Texture and Depth in Foliage
Understanding the basic structure of trees is crucial for painting them realistically. Trees are not just green blobs but have a specific anatomy. They consist of a trunk, branches, and leaves, each with its unique characteristics. The trunk is usually the darkest part, while the leaves can vary in color and shape depending on the type of tree and the season. Wikipedia is a great resource to learn more about tree anatomy.
Creating texture and depth in foliage is essential for bringing your tree paintings to life. To create texture, use different brush strokes and vary the thickness of your paint. For depth, remember that objects in the distance should be less detailed and lighter in color than those in the foreground. This technique, known as atmospheric perspective, can help create a sense of depth and distance in your paintings.
In conclusion, painting forests and trees can be a rewarding experience. By understanding tree anatomy and mastering the techniques to create texture and depth in foliage, you can create stunning oil paintings of nature scenes. Remember, practice is key, so keep painting and experimenting with different techniques.
Painting Water and Reflections
Water is a captivating subject in landscape oil painting. It can add depth, interest, and a sense of realism to your artwork. However, painting water and reflections can be challenging. In this section, we’ll explore the properties of water in painting and how to create realistic reflections.
- Understanding the properties of water in painting
- Creating realistic reflections
Water is not a solid object; it’s a reflective, transparent, and constantly moving surface. When painting water, it’s important to understand these properties. Water reflects the colors and shapes of the objects around it. The color of water is usually not just blue; it can be green, gray, or even brown, depending on the surroundings and the light conditions.
Water also has a certain degree of transparency. This means you can often see what’s beneath the surface. To depict this, you might need to paint the objects under the water first, and then add the water surface.
Remember, water is always in motion. Even in a calm lake, there are subtle ripples and waves. To capture this, use loose, fluid brush strokes.
Reflections can add a sense of realism to your water scenes. They mirror the colors and shapes of the objects above the water. However, reflections are not perfect copies. They are usually darker and less detailed than the objects they reflect.
To paint reflections, start by painting the object that is being reflected. Then, paint the reflection directly below it, using darker and less saturated colors. Make sure to keep your brush strokes horizontal to suggest the flat surface of the water.
Remember, the reflection of an object in water is always directly below the object, regardless of your viewpoint. Also, the reflection of a tall object will be longer in the water than the object itself.
Painting water and reflections can be a challenge, but with practice and understanding, you can create beautiful, realistic water scenes in your landscape oil paintings. So grab your brushes and start painting!
Art of Landscape Painting
Mastering the art of landscape painting is a journey that requires understanding of various elements. One of the most crucial aspects is composition. Let’s delve into it.
Understanding Composition
Composition in landscape painting refers to how the elements of your artwork are arranged. It’s about creating a balanced, harmonious piece that guides the viewer’s eye throughout the painting. There are several key principles to consider when composing your landscape painting.
- Rule of Thirds in Landscape Painting
- Creating a Focal Point
The rule of thirds is a fundamental principle in visual arts, especially in landscape painting. Imagine your canvas divided into nine equal parts by two equally-spaced horizontal lines and two equally-spaced vertical lines. The rule suggests placing the most important elements of your painting along these lines or at their intersections. This technique creates more tension, energy, and interest in the composition than simply centering the subject would. Learn more about the rule of thirds here.
A focal point is the area of the artwork that draws the viewer’s eye. It’s the part of the painting that stands out and captures attention. In landscape painting, a focal point could be a tree, a building, or a mountain peak. The focal point should be strategically placed using the rule of thirds. The surrounding elements should support and lead towards the focal point, creating a sense of harmony and balance. Find out more about creating a focal point here.
Understanding and applying these principles of composition can significantly improve your landscape paintings. Remember, art is subjective, and these rules are not set in stone. Feel free to experiment and find what works best for your style.
Creating Mood and Atmosphere
One of the most powerful tools in an artist’s arsenal is the ability to create mood and atmosphere in their work. This can be achieved through the use of color and atmospheric perspective. Let’s delve into these two techniques.
- Using color to create mood
- Creating atmospheric perspective
Color is a powerful tool in the hands of an artist. It can evoke emotions and set the tone for a painting. For example, warm colors like red, orange, and yellow can create a sense of warmth, happiness, or excitement. On the other hand, cool colors like blue, green, and purple can evoke feelings of calm, tranquility, or sadness.
Consider the work of the famous artist Vincent van Gogh. His use of bold, vibrant colors in his painting “Starry Night” creates a sense of wonder and awe. The swirling blues and yellows draw the viewer in, creating a mood of enchantment.
Atmospheric perspective is a technique used by artists to create the illusion of depth in a painting. It involves subtly changing the color, value, and detail of objects as they recede into the background. This mimics the way our eyes perceive distance in real life.
For instance, objects in the distance are usually less detailed, lighter in value, and cooler in color than objects in the foreground. This technique can be seen in the works of the renowned artist Leonardo da Vinci, who was known for his mastery of atmospheric perspective.
By understanding and applying these techniques, you can create a mood and atmosphere in your landscape oil paintings that will captivate your viewers and take them on a visual journey. Remember, art is not just about replicating what you see. It’s about conveying a feeling, a mood, an atmosphere. So, don’t be afraid to experiment with color and perspective to create the mood and atmosphere you want in your paintings.
Capturing Nature in Art
Art is a beautiful way to express our feelings, thoughts, and perceptions. One of the most captivating subjects for artists has always been nature. The beauty, complexity, and diversity of the natural world provide endless inspiration. But how can we truly capture the essence of nature in our art? It involves two key steps: observing and understanding nature, and translating those observations into art.
- Observing and Understanding Nature
Before we can begin to capture nature in our art, we must first learn to truly see it. This involves more than just looking at a landscape or a flower. It involves observing the details, understanding the colors, the light, the shapes, and the textures. It’s about noticing how the light changes throughout the day, how the colors change with the seasons, and how the shapes and textures vary in different weather conditions.
Observing nature also involves understanding the science behind it. For example, knowing why the sky is blue or why leaves change color in the fall can help us create more realistic and accurate art. You can learn more about the science of nature on Wikipedia.
- Translating Observations into Art
Once we have observed and understood nature, the next step is to translate those observations into art. This involves using our artistic skills and techniques to recreate the colors, shapes, textures, and light we have observed.
For example, if we are painting a landscape, we might start by sketching the basic shapes of the trees, mountains, and sky. Then we would add color, starting with the lightest colors and gradually adding darker colors. We would pay attention to the direction of the light and the shadows it creates. We would also try to capture the textures we observed, such as the rough bark of a tree or the smooth surface of a lake.
Translating observations into art is not just about recreating what we see. It’s also about expressing our personal feelings and impressions. It’s about creating a piece of art that not only looks like nature, but also feels like nature.
Remember, capturing nature in art is a journey, not a destination. The more we observe and understand nature, the better we will become at translating those observations into art. So, let’s grab our art supplies and start our journey!
Oil Painting for Beginners
Welcome to the world of oil painting! This is a rewarding and expressive art form that can be enjoyed by anyone, regardless of age or experience level. Let’s dive into the basics to help you get started.
Getting Started
Before you can start creating your own masterpieces, there are a couple of important steps you need to take.
- Choosing your first set of oil paints
- Understanding the basics of color mixing
Choosing your first set of oil paints can be an exciting yet daunting task. There are many brands and colors to choose from. For beginners, it’s recommended to start with a basic set. A basic set usually includes primary colors (red, blue, and yellow), secondary colors (green, orange, and purple), and a few neutrals (black and white). Brands like Winsor & Newton and Gamblin are known for their quality and are beginner-friendly. Remember, it’s not about having the most expensive set, but understanding how to use them. You can find more information about oil paints on Wikipedia.
Understanding the basics of color mixing is essential in oil painting. With just the primary colors, you can create a wide range of hues. Here’s a simple guide to get you started:
| Color 1 | Color 2 | Result |
|---|---|---|
| Red | Blue | Purple |
| Blue | Yellow | Green |
| Yellow | Red | Orange |
Experimenting with color mixing can be a fun and educational process. Don’t be afraid to make mistakes and learn from them. Remember, every great artist was once a beginner.
First Painting Project
Embarking on your first painting project can be an exciting yet daunting endeavor. But don’t worry, we’re here to guide you through it. We’ll start with choosing a simple nature scene and then provide a step-by-step guide to creating your first painting.
- Choosing a Simple Nature Scene
- Step-by-Step Guide to Your First Painting
Choosing the right scene for your first painting is crucial. A simple nature scene is the perfect starting point for beginners. It allows you to practice basic techniques without overwhelming you with complex details. Consider a scene with a single tree, a small pond, or a simple sunset. These scenes provide a variety of colors and shapes to work with, but are not overly complicated. You can find inspiration from nature around you or use images from the internet. Remember, the goal is not to create a masterpiece, but to learn and enjoy the process.
Now that you’ve chosen your scene, let’s get started with the painting process. Here’s a step-by-step guide:
| Step | Description |
|---|---|
| 1 | Sketch your scene lightly with a pencil on your canvas. |
| 2 | Start with the background. Use broad strokes to fill in the sky and any large areas of color. |
| 3 | Move on to the middle ground. This could be trees, hills, or a body of water. |
| 4 | Finally, paint the foreground. This is where you can add more detail and texture. |
| 5 | Let your painting dry. Oil paints can take a while to dry, so be patient. |
Remember, the goal is to learn and enjoy the process. Don’t be discouraged if your first painting doesn’t turn out exactly as you envisioned. With practice, you’ll improve and develop your own unique style.
By following these steps, you’ll be well on your way to creating your first landscape oil painting. Happy painting!
Landscape Art Techniques
Mastering landscape art involves learning a variety of techniques. Two of the most important techniques for creating stunning landscape art are creating depth and perspective, and painting different times of day. Let’s explore these techniques in detail.
- Creating Depth and Perspective
Creating depth and perspective in your landscape art can make your work come alive. It’s all about making the viewer feel as if they could step right into the painting. Here are some tips to help you create depth and perspective:
- Use size and placement: Objects that are closer to the viewer should be larger and lower on the canvas. Objects that are further away should be smaller and higher on the canvas.
- Use color and value: Colors become less vibrant and values become lighter as they recede into the distance.
- Use detail: Objects that are closer to the viewer should have more detail than objects that are further away.
By using these techniques, you can create a sense of depth and perspective in your landscape art. Learn more about creating depth and perspective here.
- Painting Different Times of Day
Another important landscape art technique is painting different times of day. The time of day can dramatically change the mood and atmosphere of your painting. Here are some tips for painting different times of day:
- Morning: Use soft, warm colors to create a peaceful, serene atmosphere.
- Midday: Use bright, vibrant colors to create a lively, energetic atmosphere.
- Evening: Use deep, rich colors to create a calm, relaxing atmosphere.
- Night: Use dark, cool colors to create a mysterious, quiet atmosphere.
By painting different times of day, you can create a variety of moods and atmospheres in your landscape art. Learn more about painting different times of day here.
Oil Painting Tutorials
Learning oil painting can be an exciting journey. This section will guide you through some of the best video tutorials available online that can help you master the art of oil painting.
Video Tutorials
Video tutorials are a great way to learn oil painting. They provide visual guidance and step-by-step instructions, making it easier to understand the techniques. Let’s explore some of the best resources for video tutorials and recommended YouTube channels for learning.
- Best online resources for video tutorials
- Recommended YouTube channels for learning
There are numerous online platforms that offer high-quality oil painting tutorials. Websites like Udemy and Coursera have comprehensive courses taught by professional artists. These platforms offer a mix of free and paid courses, allowing you to choose based on your budget and learning needs.
YouTube is a treasure trove of learning resources, and oil painting is no exception. Channels like Draw Mix Paint and Will Kemp Art School offer a variety of tutorials, from beginner to advanced levels. These channels not only teach you how to paint but also provide insights into the materials and techniques used by professional artists.
Remember, practice is key when it comes to mastering oil painting. So, grab your brushes, set up your canvas, and start painting along with these tutorials. Happy painting!
Written Tutorials
For those who prefer to learn at their own pace, written tutorials can be a valuable resource. They offer the flexibility to learn whenever and wherever you want. Here are some of the best resources for written tutorials on landscape oil painting.
- Best Books for Learning Landscape Oil Painting
- “Landscape Painting: Essential Concepts and Techniques for Plein Air and Studio Practice” by Mitchell Albala. This book is a comprehensive guide to landscape painting, offering step-by-step instructions and practical advice.
- “The Elements of Landscape Oil Painting: Techniques for Rendering Sky, Terrain, Trees, and Water” by Suzanne Brooker. This book offers a detailed look at the techniques used in landscape oil painting, with a focus on rendering natural elements.
- “Fill Your Oil Paintings with Light & Color” by Kevin Macpherson. This book provides insights into using light and color effectively in your paintings.
- Online Blogs and Websites for Written Guides
- Artists Network: This website offers a variety of articles and tutorials on landscape oil painting.
- LiveAbout: This site provides numerous guides and tips for beginners in landscape oil painting.
- WikiHow: This website offers a step-by-step guide to painting a landscape in oils, complete with illustrations.
Books are a timeless resource for learning new skills. They offer in-depth knowledge and can be referred to time and again. Here are some of the best books for learning landscape oil painting:
Online blogs and websites offer a wealth of information and can be easily accessed from anywhere. Here are some recommended online resources for written guides on landscape oil painting:
Whether you prefer books or online resources, these written tutorials can help you master the art of landscape oil painting. Remember, practice makes perfect, so don’t be afraid to make mistakes and learn from them.
Landscape Painting Tips
Painting landscapes can be a rewarding experience, but it can also be challenging. Here are some tips and common mistakes to avoid, gathered from professional landscape artists.
- Top tips from professional landscape artists
- Observe and Sketch: Before you start painting, spend some time observing the landscape. Make quick sketches to understand the composition and light effects. This will help you capture the essence of the scene.
- Use a Limited Palette: Professional artists often suggest using a limited palette. This not only helps in maintaining harmony in your painting but also improves your understanding of color mixing.
- Focus on Values: Values refer to the lightness or darkness of colors. Getting the values right is more important than getting the colors right. It helps in creating depth and dimension in your painting.
- Common mistakes and how to avoid them
- Ignoring the Sky: One common mistake is ignoring the sky. Remember, the sky influences the colors of everything else in the scene. So, pay attention to it and paint it with care.
- Over-detailing: Another mistake is adding too many details. This can make your painting look cluttered. Instead, focus on capturing the big shapes and the overall mood of the scene.
- Not Using Reference Photos: While painting from life is ideal, it’s not always possible. So, don’t hesitate to use reference photos. But remember, they are just a reference. Don’t try to copy them exactly.
Remember, practice is key in landscape painting. Don’t be disheartened by mistakes. Instead, learn from them and keep painting. As Vincent Van Gogh said, “I am always doing what I cannot do yet, in order to learn how to do it.”
Oil Painting Landscape Inspiration
Creating a landscape oil painting can be an exciting journey. Inspiration is everywhere, but sometimes, it can be challenging to find. Here are two key areas where you can find inspiration for your next masterpiece.
- Finding Inspiration in Your Local Environment
Your local environment is a treasure trove of inspiration. Whether you live in a bustling city or a serene countryside, there are countless scenes waiting to be captured on canvas. Look around you. The towering skyscrapers, the tranquil lakes, the vibrant flower beds, the rustic barns – each of these can be a source of inspiration.
Take a walk around your neighborhood. Visit local parks, gardens, or even the downtown area. Observe the colors, the light, the shadows, the shapes, and the textures. Carry a sketchbook with you and make quick sketches of scenes that catch your eye. These sketches can serve as a reference for your oil paintings.
- Exploring Art History for Inspiration
Art history is another rich source of inspiration. By studying the works of great landscape artists, you can learn about different styles, techniques, and approaches to landscape painting. Artists like Claude Monet, Vincent van Gogh, and Thomas Cole have left a lasting legacy in landscape art. Their works can inspire you to see the world around you in a new light.
Visit art museums, galleries, or even online art databases. Study the works of different artists. Notice how they use color, light, and composition to create a mood or tell a story. You can incorporate these elements into your own work.
Remember, inspiration is not about copying what you see. It’s about interpreting it in your own unique way. So, let the world around you and the works of great artists inspire you to create your own landscape oil paintings.