Introduction to Still Life Oil Painting
Welcome to the world of still life oil painting! This form of art has been around for centuries and continues to captivate artists and art lovers alike. In this blog post, we will delve into the art of oil painting and explore why still life oil painting is a popular choice for many artists.
- Understanding the art of oil painting
- Why choose still life oil painting
Oil painting is a type of slow-drying paint that consists of particles of pigment suspended in a drying oil, commonly linseed oil. The viscosity of the paint can be modified by the addition of a solvent such as turpentine or white spirit, and varnish may be added to increase the glossiness of the dried oil paint film. Oil paints have been used in Europe since the 12th century for simple decoration, but were not widely adopted as an artistic medium until the early 15th century.
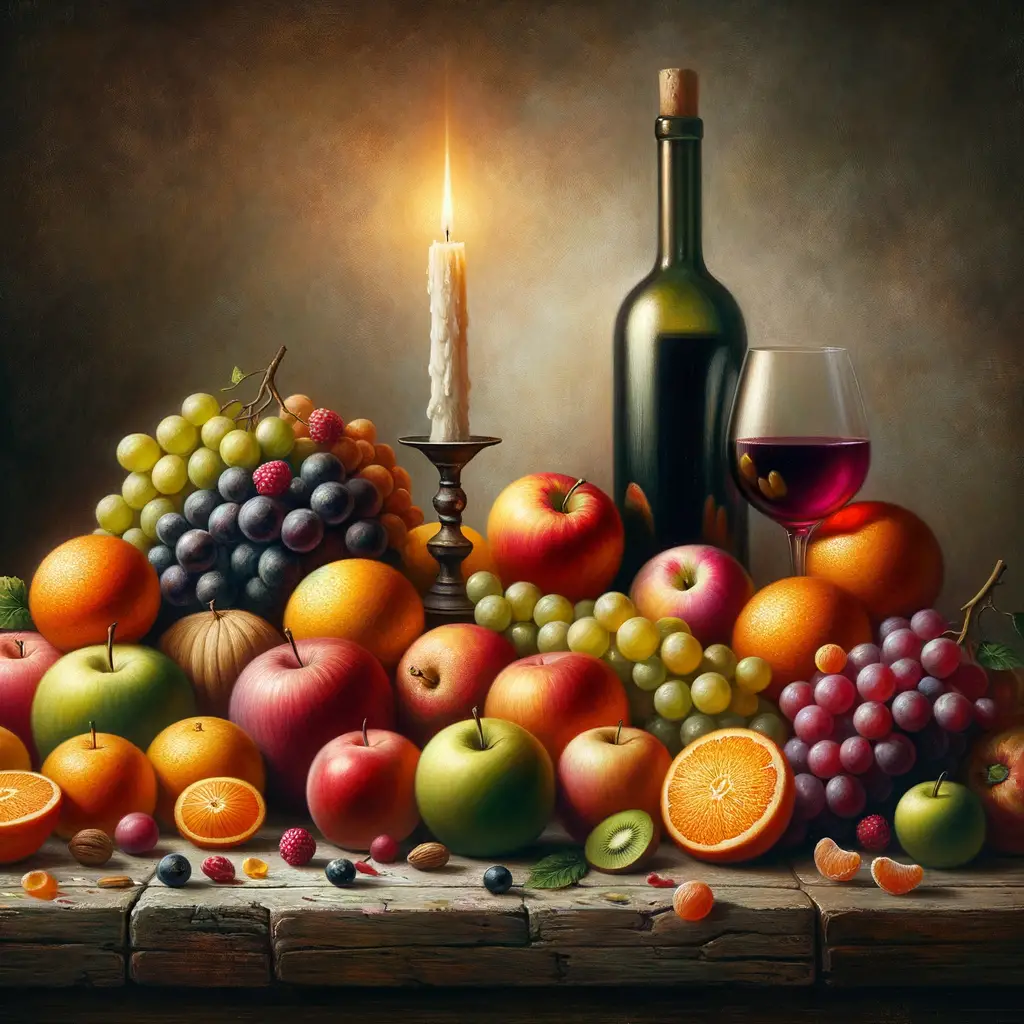
Still life oil painting is a genre of art that focuses on the arrangement of inanimate objects. This could include anything from flowers, fruits, vases, books, and more. The beauty of still life painting lies in its ability to take ordinary objects and transform them into works of art. It allows the artist to play with light, composition, and texture. Furthermore, still life painting is a great way for beginners to practice and hone their skills as it allows for a lot of flexibility and creativity. Still life is also a popular choice for many artists because it does not require a model or specific scene, meaning it can be done at any time and in any place.
Oil Painting for Beginners
Starting with oil painting can be an exciting journey. It’s a beautiful art form that allows you to create stunning pieces with depth and texture. But where do you start? Let’s dive into the basics.
Getting Started
Before you can start creating your masterpiece, there are a couple of things you need to do first. This includes choosing your materials and setting up your workspace.
- Choosing your materials: The first step in your oil painting journey is to choose the right materials. This includes the paint, brushes, and canvas. When it comes to paint, you’ll want to start with a basic set of colors. You can always add more as you go along. For brushes, a few different sizes and shapes will give you a range of strokes. Lastly, you’ll need a canvas. You can buy these pre-made or make your own.
- Setting up your workspace: Once you have your materials, you’ll need to set up your workspace. This should be a well-lit area where you can comfortably sit or stand for long periods. You’ll also need a palette for mixing your paints and a container for cleaning your brushes. It’s a good idea to cover your workspace with newspaper or a drop cloth to protect it from any paint spills.
Now that you have your materials and workspace set up, you’re ready to start painting. Remember, the key to becoming a great artist is practice. Don’t be discouraged if your first few paintings don’t turn out the way you want. Keep trying, and you’ll improve over time.
Basic Still Life Oil Painting Techniques
When it comes to still life oil painting, there are two fundamental techniques that every beginner should grasp. These are understanding color theory and mastering brush strokes. Let’s delve into these techniques.
- Understanding Color Theory
Color theory is the backbone of painting. It’s the science and art of using color. It explains how colors interact with each other and how they can be combined to create an appealing scene.
There are three primary colors: red, yellow, and blue. These colors cannot be made by mixing other colors. Secondary colors (green, orange, and purple) are made by mixing two primary colors. Tertiary colors are made by mixing a primary color with a secondary color.
Understanding color theory will help you create depth and mood in your paintings. For example, warm colors (like red, orange, and yellow) can make objects appear closer, while cool colors (like blue, green, and purple) can make them seem further away. Learn more about color theory here.
- Mastering Brush Strokes
Brush strokes are the building blocks of your painting. They can express texture, form, and even emotion. There are many different types of brush strokes, but here are a few basics:
- Flat Brush Stroke: This is a simple stroke made with a flat brush. It’s perfect for filling in large areas with color.
- Round Brush Stroke: This stroke is made with a round brush. It’s great for creating soft edges and blending colors.
- Dry Brush Stroke: This technique involves using a dry brush with very little paint. It’s used to create a rough texture.
Mastering brush strokes takes practice. Try experimenting with different brushes and techniques to see what works best for you. Remember, the goal is not to make perfect strokes, but to express your unique style and vision. Learn more about brush strokes here.
By understanding color theory and mastering brush strokes, you can create beautiful still life oil paintings. So grab your brushes and start painting!
Advanced Oil Painting Techniques
As you continue to grow as an artist, it’s important to explore advanced oil painting techniques. These methods can help you to create more complex and detailed artwork. Let’s delve into different styles of oil painting.
Exploring Different Styles
There are many different styles of oil painting, each with its own unique characteristics. Two of the most popular styles are Impressionism and Realism.
- Impressionism
- Realism
Impressionism is a style of painting that originated in France in the late 19th century. It’s characterized by small, thin, yet visible brush strokes. The focus is often on the accurate depiction of light and its changing qualities. Impressionist artists like Claude Monet and Pierre-Auguste Renoir are famous for their ability to capture the essence of a scene, rather than its details.
Realism, on the other hand, is a style that aims to represent subject matter truthfully, without artificiality and avoiding artistic conventions. It emerged in the mid-19th century in response to the overly dramatic and emotional styles of Romanticism and History painting. Realist painters like Gustave Courbet and Jean-Baptiste-Camille Corot focused on depicting everyday scenes and people as they are, without idealization.
Both Impressionism and Realism offer unique approaches to oil painting. By understanding and practicing these styles, you can broaden your artistic skills and create more diverse works of art.
Mastering Techniques
As you continue to explore the world of oil painting, there are two techniques that can help you take your art to the next level: Glazing and Scumbling. These methods can add depth and texture to your paintings, making them more vibrant and realistic.
-
Glazing
Glazing is a technique where you apply a thin, transparent layer of paint over a dried layer. This can create a stunning, luminous effect. The light passes through the glaze and reflects off the underlying layer, giving your painting a depth and glow that’s hard to achieve with other techniques.
For example, if you’re painting a sunset, you might start with a layer of bright yellow. Once that’s dry, you could apply a glaze of red. The result? A beautiful, glowing orange that looks just like a real sunset.
Remember, the key to successful glazing is patience. Each layer needs to be completely dry before you apply the next. This can take time, but the results are worth it.
-
Scumbling
Scumbling is another advanced technique that can add texture and depth to your paintings. It involves applying a thin, opaque layer of lighter paint over a dried darker layer. The lighter paint should be quite dry and applied in a broken manner so that some of the darker paint shows through.
This technique is great for creating the effect of light shining through clouds, or for adding texture to objects in a still life painting. For example, if you’re painting an apple, you might use scumbling to create the effect of light reflecting off the apple’s skin.
Like glazing, scumbling requires patience and practice. But once you’ve mastered it, you’ll be able to create stunning effects in your paintings.
Mastering these techniques can take your oil paintings to a whole new level. So why not give them a try? Remember, the key to becoming a great artist is practice, so don’t be afraid to experiment and make mistakes. Happy painting!
Composition in Art
Art is a beautiful and expressive form of communication. One of the key elements that make a piece of art stand out is its composition. Let’s delve into understanding this crucial aspect.
Understanding Composition
Composition in art refers to how the elements of an artwork are arranged to create a cohesive whole. It’s like a roadmap that guides the viewer’s eye around the artwork. Understanding composition can significantly enhance the impact of your still life oil paintings.
- Importance of composition in still life painting
- Basic principles of composition
- Balance: This refers to the distribution of visual weight in a painting. A balanced composition feels stable and aesthetically pleasing.
- Emphasis: This involves making one part of a painting stand out to draw the viewer’s attention.
- Unity: This principle ensures that all elements of the artwork work together to create a cohesive whole.
- Contrast: This involves using differences in elements such as color, shape, and texture to add interest and variety to a painting.
Composition is the backbone of still life painting. It helps in arranging objects in a way that is pleasing to the eye. A well-composed painting can draw the viewer in, guiding their eyes around the canvas, and help them appreciate the beauty and significance of the objects depicted. For example, a still life painting of a bowl of fruit can be transformed from a simple depiction of everyday items into a captivating piece of art through effective composition.
There are several principles of composition that artists use to create visually appealing works. These include:
Understanding and applying these principles can help you create still life paintings that are not only visually appealing but also convey your artistic vision effectively.
Oil Painting Composition Techniques
When creating a masterpiece with oil paints, there are two essential composition techniques you should know – creating balance and using negative space. These techniques can help you to create more engaging and visually appealing paintings.
- Creating Balance
Balance in a painting is like balance in life. It provides a sense of stability and harmony. In oil painting, balance doesn’t always mean symmetry. Instead, it’s about distributing elements so that they counterbalance each other. For example, a large, bright object on one side of the painting can be balanced by several smaller, darker objects on the other side.
Consider the famous painting “The Last Supper” by Leonardo da Vinci. Despite the asymmetrical arrangement of the figures, the painting feels balanced because of the way da Vinci has distributed the elements within the composition.
- Using Negative Space
Negative space is the area around and between the subjects of an image. In oil painting, using negative space effectively can enhance the impact of your subject. It can help to define the boundaries of positive space and bring balance to your composition.
Take, for example, the painting “The Scream” by Edvard Munch. The swirling, empty sky around the figure creates a powerful negative space that enhances the emotional impact of the painting.
By mastering these techniques, you can create oil paintings that are not only beautiful but also deeply engaging. Remember, practice makes perfect. So, don’t be afraid to experiment with balance and negative space in your compositions.
Lighting in Oil Painting
Lighting plays a pivotal role in oil painting. It can dramatically alter the mood and perception of a piece, making it an essential tool for artists. In this section, we will delve into the importance of understanding lighting in oil painting.
Understanding Lighting
Before we can effectively use lighting in our oil paintings, we must first understand its role and the different types available to us.
- Role of lighting in still life painting: Lighting in still life painting is crucial as it helps to create a sense of depth and volume. It allows the artist to highlight specific parts of the painting and draw the viewer’s attention to them. For example, a bright light can make an apple look more vibrant and appealing, while a dim light can create a more somber and quiet mood.
- Types of lighting: There are various types of lighting that artists can use in their paintings. These include direct lighting, indirect lighting, and diffused lighting. Direct lighting is when the light source is visible in the painting, creating strong shadows and highlights. Indirect lighting, on the other hand, is when the light source is not visible, but its effects are seen on the objects in the painting. Lastly, diffused lighting is a soft light that minimizes shadows and creates a calm and peaceful atmosphere.
Understanding the role and types of lighting in oil painting can greatly enhance your artwork. It can help you create more realistic and visually appealing paintings that captivate your audience.
Oil Painting Lighting Effects
Lighting effects play a crucial role in oil painting, adding depth and realism to your artwork. By mastering two key aspects – creating shadows and highlighting objects – you can make your paintings come alive. Let’s delve into these techniques.
- Creating Shadows
Shadows are essential in oil painting as they give the illusion of depth and perspective. They help to define the shape and form of the objects in your painting. Creating effective shadows involves understanding the source of light and how it interacts with the objects.
Start by determining the direction of the light source. Shadows will fall on the opposite side of the object from the light source. Use darker shades of your object’s color for the shadow areas. Remember, shadows aren’t always black. They are usually a darker version of the color of the object that’s casting the shadow.
For example, if you’re painting a red apple, the shadow might be a darker red or even a purplish color. The shadow’s color and intensity will depend on the light source and the surrounding environment. Experiment with different shades until you find what works best for your painting.
- Highlighting Objects
Highlights are the areas of your painting that reflect the most light. They are usually the lightest part of your painting and can help to draw the viewer’s eye to a particular area.
When highlighting, use a lighter version of your object’s color. For instance, if you’re painting a yellow banana, the highlights might be a very light yellow or even white. The shape and placement of the highlights will depend on the shape of your object and the direction of the light source.
Remember, highlights aren’t just white spots. They should blend seamlessly with the rest of your painting. Use a soft brush to blend your highlights into the surrounding areas. This will create a smooth transition and make your painting look more realistic.
Mastering the art of creating shadows and highlights in oil painting can take some practice, but the results are well worth the effort. These techniques can add depth and realism to your artwork, making your paintings more visually appealing and engaging.
Still Life Painting Tips
Still life painting is a wonderful way to hone your skills as an artist. It allows you to focus on the details of objects, their colors, shapes, and textures. Here are some tips to help you improve your still life painting skills.
-
Choosing your subject
Choosing the right subject is crucial in still life painting. The subject should be something that interests you, as this will motivate you to spend time on the painting. It could be anything from a bowl of fruit to a vase of flowers, or even a set of old books. The key is to choose something that you find visually interesting and challenging. Still life subjects offer a wide range of possibilities, so don’t be afraid to experiment.
-
Practicing regularly
Like any other skill, painting improves with practice. Make it a habit to paint regularly, even if it’s just for a few minutes each day. This will help you develop your skills and become more comfortable with your painting techniques. Remember, the goal is not to create a masterpiece every time, but to learn and improve. As the old saying goes, “practice makes perfect”.
Still life painting can be a rewarding and fulfilling hobby. With the right subject and regular practice, you can create beautiful works of art that you can be proud of. So grab your paintbrush and start painting!
Still Life Oil Painting Tutorial
In this section, we will walk you through a step-by-step guide on how to create a beautiful still life oil painting. This tutorial is designed to be easy to follow, even for beginners. Let’s get started!
Step-by-Step Guide
- Setting up your still life
- Sketching your composition
- Applying paint
- Adding details and finishing touches
First, choose the objects you want to paint. These could be anything from fruits to vases or books. Arrange them in a way that appeals to you. Remember, the light source is important as it will cast shadows and highlights on your objects. Take a photo of your setup for reference.
Next, sketch your composition on the canvas. Start with simple shapes to represent your objects. Don’t worry about details at this stage. The goal is to get the placement, size, and overall shape right. Use your photo reference to help you.
Now, it’s time to start painting. Start with a thin layer of paint, focusing on the darkest areas first. This is known as the “underpainting”. It will help you establish the values and colors in your painting. Use a larger brush for this stage to avoid focusing on details too early.
Once your underpainting is dry, you can start adding details. Use a smaller brush for this stage. Focus on the highlights, mid-tones, and shadows. Remember to take your time and enjoy the process. Once you’re happy with your painting, sign it and let it dry.
And there you have it! You’ve just completed your first still life oil painting. Remember, practice makes perfect. So, don’t be discouraged if your first few attempts don’t turn out as you’d like. Keep painting and you’ll see improvement over time.
For more information on oil painting techniques, you can visit this Wikipedia page.